Showing posts with label DIY stuff. Show all posts

Monday, April 6, 2015

DIY Lily Pipe Magnet Cleaner

 I've been using flexible brush (Marina cleaning brush) to clean my lily pipe but every time it always give me a fright of breaking the glass. The brush is not flexible enough especially around the corner. I come up with an idea of using magnet to clean the inner lily pipe. It is not new idea, I saw people DIY magnet glass cleaner using 2 magnets and wrap one of them with filter wool. Using the same idea by wrapping small metal, small enough to fit inside lily pipe, with filter wool and use magnet to move it around.

What you need:
Ball bearing, filter wool and strong magnet. I use about 5mm diameter ball bearing. Ball bearing size can be different depending on you lily pipe inner diameter. I got the strong magnet from broken 3.5" hard drive.

Slice the filter wool. I cannot use the whole wool because it is too thick, cannot fit the tube.

Wrap the ball bearing with filter wool

Tie it and cut away the excess and that about it.
 

Test run, cleaning curve section of lily pipe

and cleaning straight section of lily pipe

Tuesday, September 4, 2012

DIY Powered Surface Skimmer

Standard surface skimmer

Small motor to power the surface skimmer

In case you have shallow tank, you can cut the surface skimmer.

Connect the small motor to the surface skimmer using piece of 16/22 hose

and that about it, powered surface skimmer. It is not as nice as ADA VUPPA-I but will do the job.

Friday, May 18, 2012

Fixing Eheim 2217 Rattle Noise

After years in service (15 plus years), my trusty Eheim 2217 finally acting up. For the pass couple of days it produced loud rattle noise. I dismantle the filter, especially the impeller area and found that the shaft rubber cap was loosen due to wear and tear as well as age. This cause the impeller to miss align and after thousand or maybe million rotation, the shaft hole is giving up and become ellipse. This is where the noise coming from. The impeller was hitting the wall during rotation.

Picture of the shaft where one of the rubber cap is loose.

Impeller picture where the hole become ellipse due to continuous friction with the shaft.

Zoom in on the hole, colored in red for easy viewing.

So I replace the whole assembly, bought new impeller and shaft which cost me total S$37 (S$29 + S$8) and it silent like brand new. My advice next time when you service your filter and feel that the shaft is loose, change it.

Tuesday, January 24, 2012

Surface Skimmer for Lily Pipe

I'm on the way back from my home town, 2 hours flight with nothing to do. So I was trying to get some inpiration for my new scape when an idea strike me. An add-on surface skimmer to lily pipe inlet. Normal surface skimmer in the market does not look nice and defeat the purpose of using lily pipe. Without surface skimmer, the surface oil can be quite thick. Me current solution is by adding couple of guppy.

Below are what I sketch during the flight..
Second version with floatable head
OK, sketch is easy, make it real is hard.

Some issue that I can think of:
1. Need a transparent tube which does not turn cloudy after long period in the water. Non tranparent will defeat the purpose of using lily pipe.
2. Secondly need to source for plastic screw, metal screw will scratch the lily pipe glass. Also need a way to create screw thread on the pipe. This screw will be used to secure the surface skimmer to the lily pipe. Need at least three.
3. Need some material for the bottom, the part that blocking partial of the inlet.

Tuesday, March 29, 2011

DIY CO2


I decided to use DIY CO2 for this setup to speed up my plants growth. Both non CO2 and daily Excel dosing does not give enough grow rate.

My DIY CO2 setup is pretty simple:
- 2 bottles of 1.5L soft drink (empty)
- 2 bubble counter
- 2 check valve
- Airstone
- CO2 hose


I did not use diffuser since it may not generate enough pressure to push CO2 through but I put airstone under filter inlets. That way most of the CO2 will be suck in by filter but it may cause airlock in some filter if lots of CO2 is created. Buble counter function as an indicator which bottle need to change. The check valve is to prevent CO2 from leaking out when one of the bottle being replace. I did not premix the solution together at the same time.


Simple sketch


I've been researching through out the net about DIY CO2 recipe and found that wine yeast suppose to be used instead of normal bread yeast. Apparently alcohol is toxic to yeast and alcohol is by product when yeast consume Glucose to generate energy in Anaerobic condition. Wine yeast on the other hand can tolerate highest level of alcohol and acidity. Thus in theory wine yeast will give you longer CO2 generator


Aerobic condition:

Glucose + O2 --> CO2 + H2O + Energy


Anaerobic condition:

Glucose --> CO2 + Alcohol + Energy


Searching around for wine yeast and found out that it cost 10 times more than normal yeast from supermarket. So forget about the idea of using wine yeast and use instant yeast instead (Saccharomyces Cerevisiae) from Bake King


My recipe:
- 2 cup of sugar
- 1/4 teaspoon of yeast
- 1/2 teaspoon of baking soda
- 1000 ml of water


Honestly it really not bad. I was haunted by post on forums, people was saying that DIY CO2 have unstable output. On contrary, I was able to get good stable output at least 0.5 bps for a month.


Update (12 October 2011)
BPS output from 1 bottle through out 37 days.


Friday, April 3, 2009

Aquascaping Tools Pouch

Too many Aquascaping tools (Sand flatenner, different type of scissors and differen type of tweezers) and wondering how too keep?

Simple, Daiso S$2 "easy work pouch". It is suppose to be for gardening purpose, thus you can get it from gardening section. What need to be done is little bit of sewing to partition the pouch into different compartment for individual tool. You can use either sewing machine or do it manually.

It is come with 2 big pouch, each pouch can be devided into 3 individual compartment. Each compartment can nicely fit one tool.

This is what my finished pouch look a like:


Me wearing aquascaping tool pouch:


Saturday, January 31, 2009

DIY Light Pendant

My 3ft tank is powered by Metal Halide (MH). It is very basic type, only MH and control gear no Fluorescent lamp and night LED light. Problem is It harsh to the eye. For that I wash thinking to add PL light t soften the view. Unfortunately adding those 3ft T5 light would end-up blocking some of the light. The only way is to hang light bulb on left, right and at the same height as MH. Searching light pendant at light shop doesn't seem to be fruitful. All the pendant that they have either too wide, too tall or too narrow, not to mention expensive. I guess it is time for DIY.

Parts are shown below:


Part list:


  1. Disposable aluminum pan, 2 for S$2.70

  2. Clip on light fixture S$2.80

  3. Light bulb, price depend on the wattage

  4. Double sided tape, and sticky tape

Total around S$4.15 (excluding light bulb)


First cut the aluminum pan from the edge to the center as shown on the picture (left) below. Bend it so that it create a cone shape. Use double sided tape, glue or other mean to keep the cone in shape.


After that use the light bulb holder and mark it on the cone. Cut the aluminium foil as shown in figure below (middle), insert the light bulb holder and secure it using sticky tape.


DIY pendant hang together with MH. It may not pretty but serve its purpose well.


Sunday, October 19, 2008

Install External Sensor on Resul CL-280


I have been wondering for a while whether low temperature help the plants a lot or not. Many peoples in forum seems to agree that low temperature improve the plants grow. So I decided to add Resun CL-280 chiller to my 3ft tank (October 11th), to see whether it is great improvement or just marginal. The average air temperature is around 30 degree C, target water temperature is around 25 degree C. Tank size is 200 liters, minus rocks, substrate, wood and plant mass, probably left about 150 liters. The setup is "Tank -> Eheim 2217 -> Chiller -> CO2 reactor -> Tank"


Resul CL-280 spec:
- Power: 280W (1/10 hp)


- Rec Pump: > 900 l/h

- Max tank size: 300L (8 degree below air temp) and 200L (15 degree below air temp)


It took about hour pluss to chill from 28 degree C to 25 degree C. After that, chiller will go to stand by mode and turn on every 5 minutes for about 2 minutes. It is stop when the temperature at 25 degree C and on when temperature is rise to about 27 degree C. This is not what I expected, water temperature should not fluctuate than much for short period of time. It was tested at night with light off, the only heat generator are filter pump and chiller it self. Furthermore the thermometer inside the tank show constand 25 degree C. To confirm this, I bought couple of digital thermometer and place in different area of the tank. To my surprise all of them show around 25.7 degree C when the chiller start turn on.


Did some research on the net and found the following:

If the water flowrate is too slow, the thermostat will read false reading and cause the chiller to start and stop regularly in short period of time. The reason is because water does not leave the heat exchager fast enough before reaching targeted temperature threshold. As a result chiller with shutting down the compressor. When the warm water from the tank gradually replaces the water inside the chamber, the chiller will start the compressor again.


There are few ways to fix my start/stop problem:

1. Change to more powerful filter or use independent pump.

I don't really like the idea, I felt that my fishes are already struggling with current 1000l/h filter. Other reason is money, new filter is not cheap. Also, I do not like extra pipe.


2. Add external thermostat

I should be able to get external thermocoupler, hook it up and put the sensor inside the tank. That should give better accuracy.


3. Use external temperature controller

Currently doing DIY temperature controller, will post once it ready.


I decided on second solution, adding external thermostat. I open up the chiller, wirring is prety staright forward, you can easily find which connector is for sensor.


The sensor is located inside small box with thin silver insulator around it, wonder if the insulator really effective. If not, the heat from the radiator might effecting the sensor reading. The tank water just enter and exit the box, no compartment to direct the water flow. It is just a simple box with coil for heat exchanger.


The sensor is normal resistive thermocoupler, inside the plastic chasing. Plastic is an insulator, I wonder is the sensor response effected because of this.


I went to Sim Lim (Electronic component shopping center) to get external thermostat and what do you know, it is not as expensive as local fish shop quote me. The fish shop quote me for S$150 but it is only S$15 at Sim Lim (Acez Instrument Pte Ltd, #B1-38). Actually, it was spare part from Fox temperature controller. By the way, Fox temperature controller is only S$65 (There goes my Temperature Controller project, total cost of DIY might not be much different than from the shop). I also manage to get the same connector use on the chiller for only S$0.80. There is slight drawback, the resistance of new sensor is slightly lower than original sensor, measuring at same temperature. It was about 600 ohm lower. Thinking of adding fix resistor to compensate but on second though, my chiller temperature control display is only 2 digit. 0.3 or 0.4 degree will not make any much different.

This is what the external sensor look a like, it made from metal or maybe encapsulate inside metal. The cable is quite long. Either way response should be faster compare to the original plastic thermostat.


After adding the external sensor, the Chiller kick in every 2 and a half hours, prety good. There is still slight problem though, by default the chiller will turn on the compressor when the temperature reading 2 degree above the set value. I wonder if this will stress the fauna? I guess DIY temperature controller were I can set the maximum and minimum threshold still good idea.


I measurement chiller power ussage using device similar to Kill-a-Watt over 24 hours. The chiller used 1.17kWh over 24 hours, with the rate of 0.3045 per kWh, 1 day equal to S$0.356, 1 month = S$10.688. Additional ~S$10 per month isn't that bad, I can leave with it.


Monday, July 21, 2008

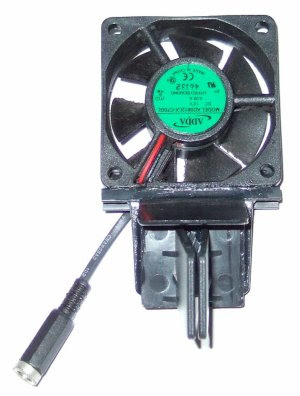
DIY Aquarium Fan for small tank

I would like to share my DIY Aquarium Fan, nothing fancy and all the parts are scavenger from broken PC. Actually it is not worth of doing DIY because the cost of buying the component is about the same as aquarium fan bought from local fish shop.

The parts are shown below:


Parts List:


  1. Fan (taken from spoil PC chasing)

  2. Power adaptor Jack (female): S$1.50

  3. 12V DC power supply: S$5 (only Choa Chu Kang neighborhood shop sell at that price)

  4. Glass divider holder: $0.30

  5. Plastic to hold the fan (taken from spoiled printer paper tray)

  6. PVC glue

Total around S$6.80 (New Aquarium fan is about S$10 - S$12)


First need to bend the paper tray about 45 degree or as you see fit. Refer to picture below, right side is original and left side after bending. I use fire from candle to head up the join and bend it while hot. Need a bit practice, we do not want it too close to fire and burn the plastic. On the other hand we want it to be close and hot enough for us to easily bend it.


Once done, glue the fan to the paper tray and then glue the paper tray to the glass divider holder. Wait for few minutes until it dry, after than solder the power adaptor jack to the fan cable and that about it.


Its look pretty good when mounted on 1ft tank.


Monday, June 16, 2008

DIY External CO2 reactor

This is actually my 2nd DIY external CO2 reactor. I'm using AMDUS drinking water filter, other water filter or container can also be use, just make sure that it can take the pressure. My previous reactor is made from PVC pipe with couples of bio ball inside. It is doing good until I realize that it is very hard to clean because everything is glued (epoxy) together. I deciced to use water filter because it can easily be open and clean.

The parts are shown below:


Parts list:


  1. Drinking water filter S$17 (AMDUS) or S$12 (CRYSTAL), there might be even cheaper brand

  2. 3/4 to 12mm hose connector: S$3.50 x 2 (Hose size can be anything from 12mm, 14mm or 19mm)

  3. DYMAX CO2 atomizer (can't remember the price, reuse my old atomizer S$1~S$2)

  4. Less than 1ft 3.5cm outher diameter PVC pipe S$0.60

  5. Air hose connector S$0.10

  6. Epoxy glue (left over from previous project)

Total around S$27


The plan is to make the water flow around the white PVC in circle. Below ais the sketch of how the water suppose to flow.


First, remove the red color button and replace it with air hose connector. Glue it with epoxy glue. To remove, just unscrew the red button from inside. This red button was originally used to expell air trapped inside the canister.


Second, connect the CO2 atomizer to the air hose connector as show in the picture below. This is optional. You can also use those small air stone, as long as it can fit in.


Next, connect the 3/4 to 12mm hose connector to both inlet and outlet and glue the PVC pipe to the blue color filter head and you get your self DIY external reactor. All done in less than 10 minutes except for the fact that you need to wait until the epoxy dry. One idea by fellow forummer at AQ is by using the inner part of filter media, you need to remove the media first though.


Lastly, I add piece of plastic (black plasting thing on top of atomizer) to direct the water flow. It can be from any plastic, in my case it was from ice cream contriner cover and cut it to fit.


This is how it worked during test: